Indicating Changed Text in Help Files
By
Tony Self
Overview
In the days of paper manuals, amendment marks were used to indicate
changed, added, or deleted text. Typical amendment marks were black
vertical bars in the page margin. When amended pages were issued, they
were accompanied by a cover sheet providing an "amendment record,"
nominating what pages were changed and what the changes comprised.
Online Help doesn't generally require similar marking of changes, as
the concept of amendments has changed. However, there are still many
circumstances when drawing a user's attention to changed text is
important. How do we do that with Help systems? By borrowing techniques
from paper manuals, we don't have to reinvent the wheel.
So here's a good approach that will work for Microsoft Word-based
HATs. (If you use a HAT not based on Word, you might have to modify this
approach to suit.)
Marking Changes in a Word-based HAT
After making changes to text, mark any added or changed text in
violet (dark purple) as shown in Figure 1. In the introductory part of
your Help, or in the "help on Help," you will need to advise users that
purple means changes. Rather than delete text, you can change the
formatting to strikethrough. This technique will work for WinHelp or HTML
Help output.
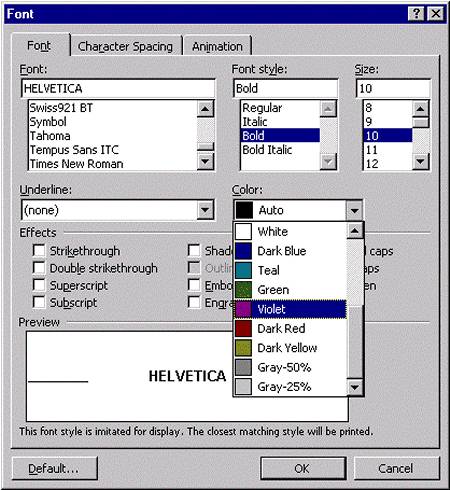
Figure 1: Applying text color.
If you are specifically developing for WinHelp, you can further mark
text by placing a vertical bar, just like an old amendment bar, to the
left of a paragraph. To do this highlight the paragraph, and then from the
Format menu choose Borders and Shading (Figure 2). On the Borders tab, set
the Apply To drop down to Paragraph, and set a border to the left. This
paragraph left border will survive the WinHelp compiling process. To
simplify the process, save this formatting as a style called
"Amended."
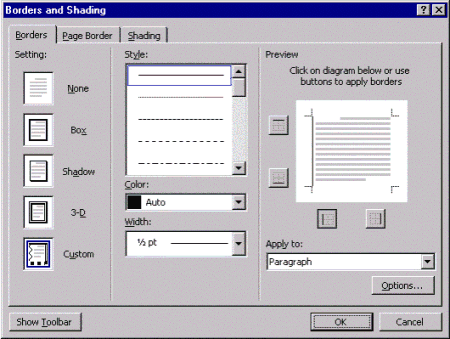
Figure 2: Applying the left border.
What you'll get is a paragraph marked up with a violet color and the
vertical bar in Word as shown in Figure 3.
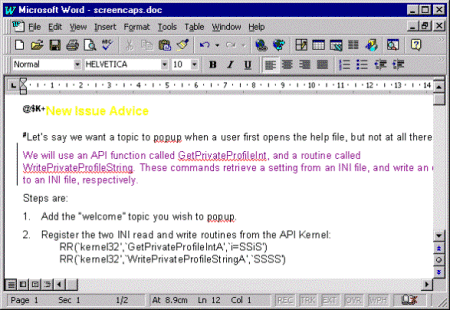
Figure 3: How the markups Look in
Word.
Figure 4 shows the paragraph after compilation into WinHelp.
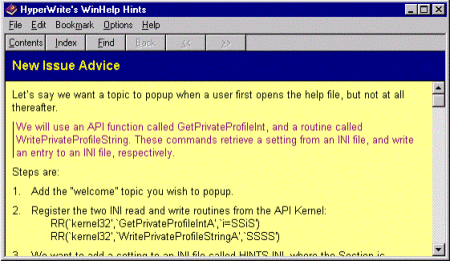
Figure 4: The results in WinHelp.
Amendment Notice
To indicate what topics have changed, you can set a search key (a K
or an A index) of the version number (eg, Ver 7) against each changed or
added topic. You can then create an "amendment notice" topic, and provide
a links to topics with the version number index. Finally, add a menu item
(perhaps to the Help menu) called Document Status, and link this menu to
the "Amendment Notice" topic.
So users can easily view the Amendment Notice topic (Figure 5), link
to changed topics, and see (provided they are not color blind to purple!)
the amended text.

Figure 5: The Amendment Notice topic.
Next Time Round
A remaining job will occur when you start working on the next round
of amendments. You will need to "unmark" the previous changes. Use the
normal Word replace function to search for purple text and replace with
the original "automatic" or black colored text. Then search for
strikethrough formatting and replace with nothing. This will delete the
strikethrough text. Finally, search for the "Amended" style (if you've
used the left paragraph border) and replace with the Normal style. You can
write (or record) a simple Word macro to automate this.
Similar Approach in HTML Help
If you are using an HTML editor to create HTML Help files, or
standard HTML pages, you can adopt a similar approach (Figure 6). Typical
editors allow you to mark up text with color, and to add strikethrough
attributes. The idea is simple, and the execution is straight
forward!
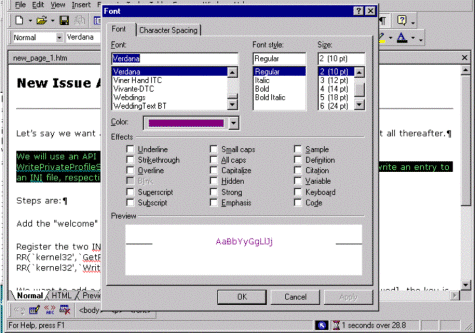
Figure 6: Marking the text in a typical HTML
Editor.
Figure 7 shows the resulting HTML Help topic.
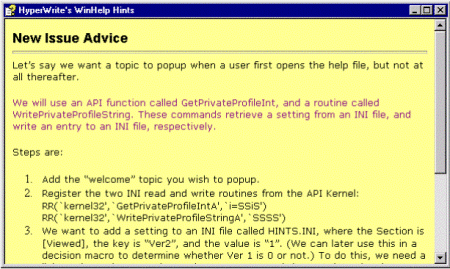
Figure 7: The results in HTML Help.
If you are comfortable working with Cascading Style Sheets (and your
users have CSS-supporting browsers), you can even display amendment bars
in your HTML Help output (similar to that shown for WinHelp in Figure 4).
This technique has been suggested by Mike Kuhn, an OHJ subscriber.
The trick is to add a Border style attribute to the changed
paragraphs. The easiest way of doing this is to add a style class called
amended to the top of the page (or the attached external style sheet file)
with the following attributes:
.amended
{
border-left: Thin;
border-top: 0pt;
border-bottom: 0pt;
border-right: 0pt;
border-color: Navy;
border-style: Solid;
padding-left: 5pt
}
Then, add that class to the <p> tag of each changed paragraph.
For example:
<p class=amended>This is the changed
paragraph.</p>
You can get fancier by using a <div> tag with a class of
.amended to do the same job.

